A polyimide heater (Polyimide Film Heater / Kapton Heater) is mainly used for heating the build platform (heated bed) in 3D printers. It can also be applied to high-temperature nozzles, hot ends, and other heating components in certain 3D printing systems.
A typical 3D printer heated bed assembly consists of a polyimide film heater + aluminum plate + printing surface, providing efficient heating performance for various 3D printing applications.
Why Are Polyimide Heaters Suitable for 3D Printers?
Feature | Advantage |
Ultra-thin design | Does not increase the thickness of the heating platform |
Flexible structure | Easily conforms to flat or curved surfaces |
Fast heating | Reduces waiting time before printing |
Uniform temperature | Helps prevent print deformation |
High temperature resistance | Suitable for demanding applications |
Electrical insulation | Provides safer operation |
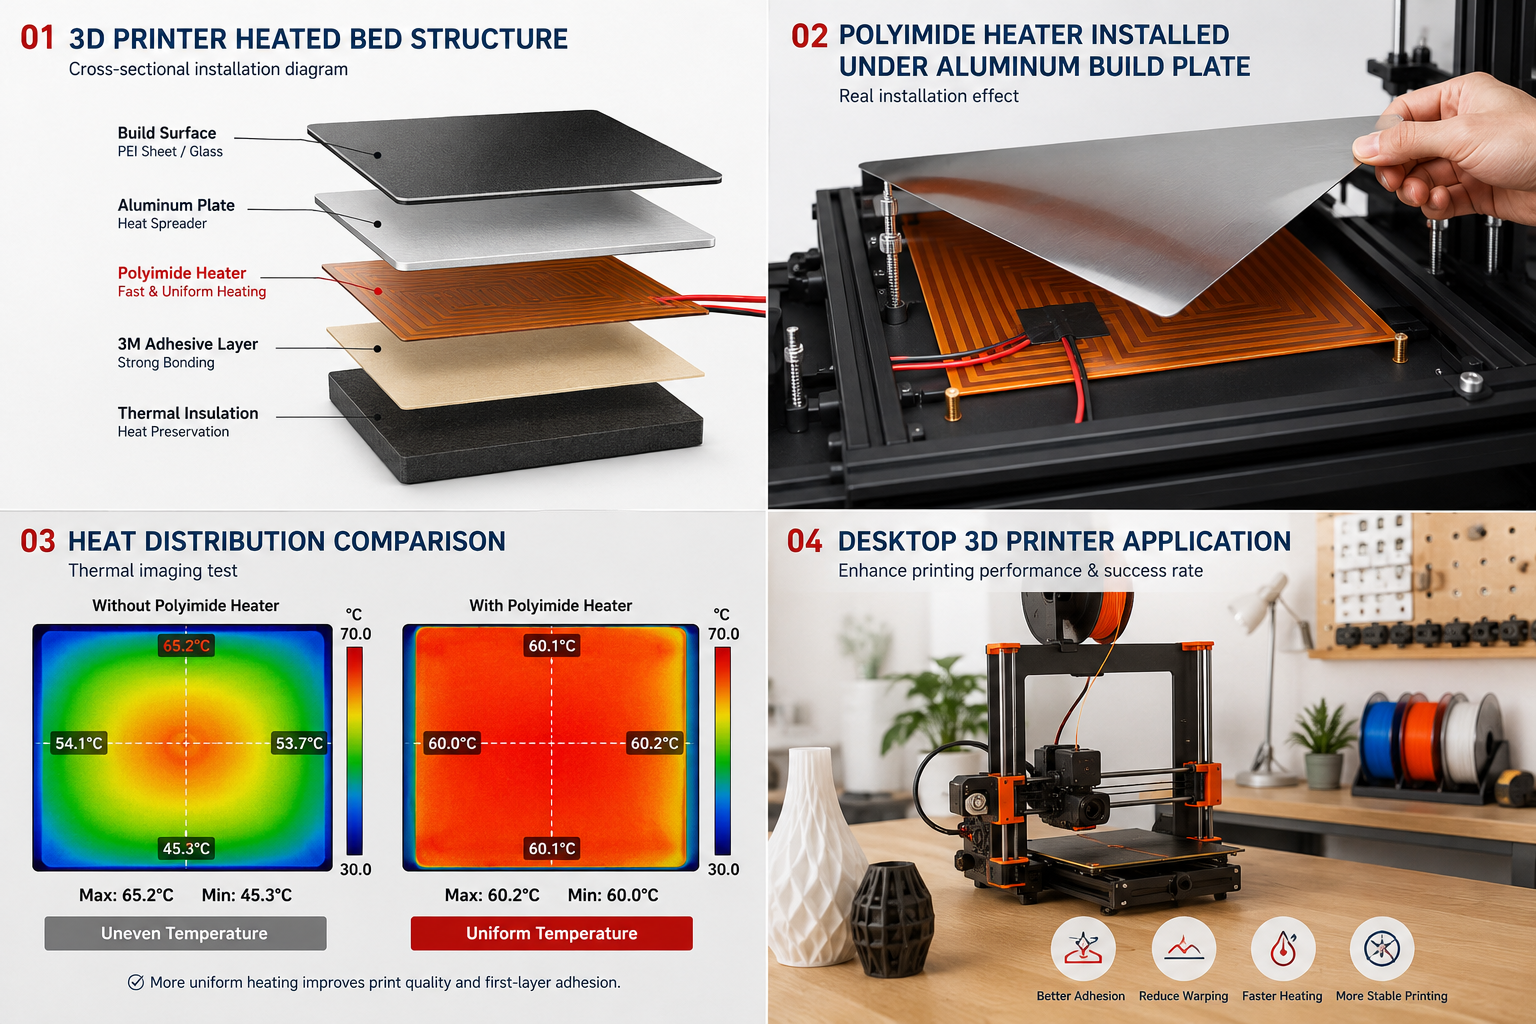
1. Bottom Side of the Heated Bed (Most Common Application)
This is the standard installation method for over 90% of polyimide heaters used in 3D printers.
PEI Sheet / Glass Build Surface
│
Aluminum Build Plate
│
==============================
Polyimide Heater
(Bonded with 3M Adhesive)
==============================
Optional Thermal Insulation
Benefits
• Provides uniform heating across the entire build platform
• Improves first-layer adhesion
• Prevents warping of ABS, ASA, PC, Nylon, and other engineering materials
• Reduces heat-up time
• Delivers stable and accurate temperature control
In many 3D printers, the polyimide heater is directly bonded to the back of an aluminum plate to create a fast-heating and efficient heated bed assembly.
2. Bonded to the Back of the Aluminum Build Plate
Equipped with 3M adhesive backing, is specifically designed for this installation method.
Installation Process
1. Clean the aluminum build plate.
2. Peel off the 3M release liner.
3. Apply the polyimide heater to the back of the aluminum plate.
4. Press firmly to eliminate air bubbles.
5. Connect the heater to the temperature controller.
6. Install thermal insulation (optional).
7. Power on and begin heating.
This installation method is widely used in both desktop and industrial-grade 3D printers.
3. Common Specifications for 3D Printer Polyimide Heaters
• Voltage: 12V / 24V
• Power range: 60W–1000W
• Common sizes:
• 120 × 120 mm (small 3D printers)
• 220 × 220 mm (popular desktop FDM printers)
• 300 × 300 mm or larger (industrial printers)
• Operating temperature:
• Standard printing: 60–110°C
• High-temperature printing: 120–200°C+
Large-Format Industrial 3D Printers
Custom polyimide heaters are commonly used for large heated beds, including sizes such as:
• 300 × 300 mm
• 350 × 350 mm
• 500 × 500 mm
• 600 × 600 mm
Advantages
• Ultra-thin construction (typically 0.15–0.30 mm)
• Lightweight design
• Excellent temperature uniformity
• High power density
• Custom sizes, voltages, and wattages available
4. Heated Chamber Applications
In industrial high-temperature 3D printers, polyimide heaters can also be installed on:
• Chamber side walls
• Chamber doors
• Top covers
These heaters help maintain a chamber temperature of approximately 60–100°C, which is essential for printing high-performance materials such as:
• PEEK
• PEKK
• ULTEM™ (PEI)
• PPS
• Carbon Fiber Reinforced Nylon
Maintaining a heated chamber minimizes thermal stress and significantly improves print quality.
5. Auxiliary Heating Around the Hot End (Less Common)
Some specialized 3D printers use polyimide heaters around the:
• Hot-end housing
• Extruder assembly
• Thermal insulation components
Benefits
• Reduces heat loss
• Improves temperature stability
• Minimizes temperature fluctuations
• Enhances print consistency during long print jobs
Any Interests,click here to check more products.
We specialize in designing products to your specific requirements. Let us help you find the right solution.
Contact Us